HTML fundamental syntax
<a href="https://www.wikipedia.org">
  Go to Wikipedia
</a>-
Opening tag,
<a>in this example. -
Closing tag,
</a>in this example. - Content in between, "Go to Wikipedia" in this example.
- Possibly attributes inside the opening tag,
href=""in this example. - Collectively, an element.
HTML fundamental syntax
<a href="https://www.wikipedia.org" target="_blank">
  <img src="/wikipedia.jpg" alt="Go to Wikipedia">
</a>- Elements can have more than one attribute.
- Elements can contain other elements.
- In that case, the one inside is known as a child element and the one outside is the parent element.
- If there are multiple levels of nesting, then all the elements inside an outer element are its descendants.
Attributes
- Most attributes only make sense on specific elements. For example,
-
href=""is foraelements, to specify where to take the user when they click the link. -
src=""is forimgelements, to specify the url of the image to load. - for="" is for
labelelements, to specify whichinputelement it is paired with.
-
- Some attributes can be put on almost any element, like
class="" or id="".- Any single
idshould only be used once per document. Aclasscan and should be used repeatedly.
- Any single
Boilerplate
- Every valid HTML document needs:
- On line 1, a declaration stating that it's an HTML document:
<!DOCTYPE html> - An
htmlelement that is the ancestor of all other elements. - The
htmlelement should have two children: aheadelement and abodyelement. - The
headelement is where we tell the browser how to process the document; things like what title to put in the browser tab, what style sheets to load, what language to use (we will always use a character set called UTF-8, which allows for all languages as well as things like emoji), etc. - The
bodyelement contains the actual content for the user.
Essential Vocabulary
Basic Content
- You'll need to sign up for a Replit account. It's a cloud-based code editing environment, like Gitpod, but lighter-weight.
- You can sign in with your GitHub account if you want.
- Then, click the blue "Fork REPL" button in the top-right corner to get a workspace to play around in.
- Read the code, modify the code, play around and make sure that you understand every single line. Ask any questions that occur to you.
Lists
Forms
Tables
- Usually we would have a PollEverywhere poll right now to gather questions, but let's try an experiment:
- Visit ask.firstdraft.com
- Sign in with the email address that you're using in Canvas.
- All of your passwords are currently "password".
- Please change your password immediately after you first sign in.
- Also feel free to change your username.
- Try creating new posts and then requesting AI replies.
ask.firstdraft.com
CSS Fundamental Syntax
h1 {
  color: maroon;
  font-weight: 700;
}- A selector, h1 in this example.
- Followed by a declaration block within curly brackets.
- Each declaration is separated from the next by a semicolon (;).
- A declaration is comprised of a property and a value separated by a colon (:).
- Collectively, the selector and declaration block is one style rule.
Selectors
- Selectors are how we specify which HTML elements we want our style rule to apply to.
- There are bunch of different selectors; for now we're going to dramatically simplify and only think about two: tag-type and class-level.
-
Tag-type selectors target all elements of a particular type, e.g. all
h1or allul:
h1 {
  color: maroon;
  font-weight: 700;
}

ul {
  list-style-type: none;
  padding-left: none;
}
Selectors
- Tag selectors are usually too broad, so typically we define classes instead by making up a name and preceding it with a dot:
.company-name {
  color: maroon;
  font-weight: 700;
}

.unstyled-list {
  list-style-type: none;
  padding-left: 0;
}
<h1 class="company-name">Our Awesome Company</h1>
<ul class="unstyled-list">
<li>Our Work</li>
<li>About Us</li>
<li>Give Support</li>
</ul>- We then apply the rules to our HTML elements using the class="" attribute:
Multiple classes
- If possible, it's a good idea to keep your class style rules modular:
- Then, you can combine them by applying multiple classes to the same HTML element:
.medium-border {
border-bottom: 5px grey solid;
}
.big-padding {
padding: 100px;
}<div class="medium-border big-padding">
<h1 class="company-name">Our Awesome Company</h1>

<ul class="unstyled-list">
  <li>Our Work</li>
  <li>About Us</li>
  <li>Give Support</li>
</ul>
</div>Multiple classes
- But then you can still use them individually elsewhere, too, which helps maintain consistency:
.medium-border {
  border-bottom: 5px grey solid;
}

.big-padding {
  padding: 200px;
}
<div class="medium-border">
« Homepage
</div>
<p class="big-padding">
Our mission is to...
</p>CSS Fundamentals
External style sheets
- Technically you could write CSS right inside an HTML element using the
style=""attribute:
- As we've seen, it's much more re-usable to define classes. And even better than putting those classes in a
<style>element within the same HTML document is to put them in an external style sheet. - Create a file ending in
.cssand then add a<link>element to the HTML file to connect it:
- Now you can easily re-use your rules across all the pages in your site.
<p style="padding: 100px;">Our mission is to...</p><link rel="stylesheet" href="/my_styles.css">External style sheets
Forms
- There's one more essential element — <form>.
- We can't really do anything with forms right now, since HTML can't process input — it's a formatting language.
- We'll learn about forms after we learn enough Ruby and Ruby on Rails to do things with user input.
That's it for the essentials
- Usually we would have a PollEverywhere poll right now to gather questions, but let's try an experiment:
- Visit ask.firstdraft.com
- Sign in with the email address that you're using in Canvas.
- All of your passwords are currently "password".
- Please change your password immediately after you first sign in.
- Also feel free to change your username.
- Try creating new posts and then requesting AI replies.
ask.firstdraft.com
Borrowing style sheets
- Of course, anyone who's been doing CSS for more than two projects begins to re-use classes that they've written.
- They start to build up very powerful baseline stylesheets that they carry from project to project.
- It wasn't long before people started sharing their stylesheets with each other.
- It wasn't very long before whole companies formed around standardizing, sharing, and selling CSS stylesheets.
Borrowing style sheets
- One very common thing to do is load fonts via external style sheets. Google offers a free web font library, for example.
- If you go there, find some fonts you like, select the styles you want, and then find the "Embed" link:
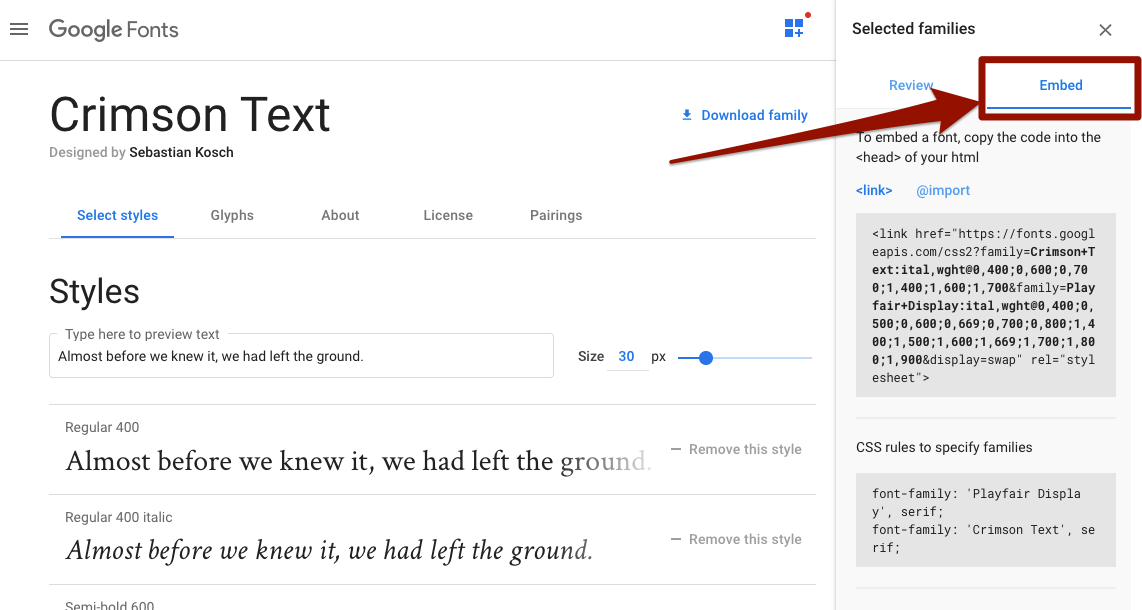
Borrowing style sheets
Or you can use my picks:
"To embed a font, copy the code into the <head> of your html:
CSS rules to specify families:
<link href="https://fonts.googleapis.com/css2?family=Crimson+Text:ital,wght@0,400;0,600;0,700;1,400;1,600;1,700&family=Playfair+Display:ital,wght@0,400;0,500;0,600;0,669;0,700;0,800;1,400;1,500;1,600;1,669;1,700;1,800;1,900&display=swap" rel="stylesheet">font-family: 'Playfair Display', serif;
font-family: 'Crimson Text', serif;Try using the above, or your own choices, to improve the typography of our site by changing the body and heading font families:
Google Fonts
Borrowing style sheets
Font Awesome
Another very handy web font to load is Font Awesome, where every "letter" in the font is a commonly used icon. (It's like Wing Dings, but useful!)
<script src="https://cdnjs.cloudflare.com/ajax/libs/font-awesome/5.13.0/js/all.min.js"></script>(You'll notice that we're using a <script> tag here instead of a <link> tag; that's because this is a slightly more sophisticated way of pulling in the CSS classes that we need, using yet another language: JavaScript. We'll talk more about that later. The effect is the same as linking an external stylesheet.)
External style sheets
Font Awesome
Search for an icon you need here and then copy-paste the HTML for it into your document. It will be an inline <i> element with some classes that they've defined in their external style sheet; for example:
<i class="fas fa-comment"></i>
<i class="fas fa-edit"></i>
<i class="fab fa-twitter"></i>
<i class="fab fa-firstdraft"></i>
Font Awesome has gained a lot of features over the years that typical fonts don't have or need; you can read about them in the docs. For example, you can animate the icons like this.
Font Awesome
External style sheets
Bootstrap
- The most commonly used external style sheet in the world is called bootstrap.css. It was originally started by some developers at Twitter while they were building internal tools, and eventually open-sourced.
- We'll be using it for the same reason they did — we want to spend as little time as possible writing CSS but we also don't want our homeworks to be so ugly and unstyled that they are confusing.
- In terms of what's essential, you just need to be able to navigate around the Bootstrap classes that the starter code will come with, and not be confused by them.
- But, learning how to apply Bootstrap to your own project is very empowering. Your HTML will look professional quickly by using it. So I encourage you to experiment.
Optional Design Readings
- On Canvas, one of the assignments is Optional design readings.
- There are a whole bunch of resources linked in there. In particular, to learn more about CSS:
- To get very good at CSS selectors, the game called CSS Diner is very good. If you're planning to do any web scraping, getting good at CSS selectors will pay dividends.
- To learn more about CSS specificity, The CSS Cascade article is very good.
- We know the basic grammar of CSS — selector, declaration block, list of property/value pairs — but there is a massive CSS vocabulary to learn. It's not like HTML, which is relatively small. It would take forever, and it's not really worth it, in my opinion; a lot of it is cruft accrued over the decades, and there are multiple ways of doing everything.
- That said, one of the readings that I found helpful was 7 Rules for Creating Gorgeous UI, but it wasn't immediately obvious to me how to achieve the effects described within with CSS. So let me share with you the properties I've settled upon for doing that.
Rule 1: Light Comes From the Sky
- Most of this rule has to do with judicious use shadows and gradients. Judicious – don't go crazy.
- These properties are nearly impossible to write by hand, especially in a cross-browser consistent manner (although much easier now in 2020).
- Here are some sweet generators for them:
- Shadow generator: https://www.cssmatic.com/box-shadow
- Gradient generator: https://www.colorzilla.com/gradient-editor/
Rules 2 & 3
- Black and white first — I tend to use Bootstrap's secondary and outline-secondary classes a lot for this.
- Double your whitespace — I use Bootstrap's mb-* (margin-bottom) classes a lot, and I usually end up defining my own that are even larger than the built-in ones.
Rule 4: Learn the methods of overlaying text on images
- This is the biggie. We talk about it a little in Foodhub but I wanted to mention a couple more useful properties.
- Blur whatever is behind the element — impossible until very recently:
.banner {
  background-color: rgba(64, 64, 64, .5);
  backdrop-filter: blur(5px);
  color: white;
}
Homework clarification
- On Foodhub, one of the tests is checking whether the Sound Bites section matches the target's responsive behavior — each cell occupies 1/4 large windows, 1/2 medium windows, and all of small windows.
To do this, you'll have to add both `col-md-*` and `col-lg-*` classes to the cells. I didn't explicitly do it in the video for that section but I did do something similar in the footer section.
04. HTML & CSS Recap
By Raghu Betina